Building a Custom SEO Bot with GPTs: A Step-by-Step Guide

What are GPTs?
Custom GPTs are powerful artificial intelligence tools tailored for specific domains or contexts, providing a level of personalization that standard ChatGPT interactions can’t match. These GPTs differ from regular chats through ChatGPT due to their custom instructions and ability to maintain a specialized knowledge base in addition to what ChatGPT has already been trained on. This allows you to create a custom GPT to address specific needs that might be challenging for ChatGPT to achieve on its own. The best part is that the process requires no coding—you simply use specific prompts and your own data to build an AI assistant that offers insights into your particular field.
All you have to do is tell the GPT builder, in plain English, what you want to create, and it will take it from there. Custom GPTs can browse the web, generate images using DALL·E 3, and even run code. This makes them incredibly versatile tools for a variety of tasks, from content creation to data analysis.
Now, it’s a bit confusing because GPT also stands for Generative Pre-trained Transformer, which refers to the family of AI models built by OpenAI. Why OpenAI didn’t make a clearer distinction between GPT and custom GPTs is beyond me. But for the purposes of this article, when we mention “GPT,” we’re talking about the custom chatbots you can build.In the sections that follow, we’ll delve into the advantages of custom GPTs, especially for SEO professionals, and guide you through the steps to create your own. By the end of this article, you’ll be well-equipped to harness the full potential of custom GPTs, transforming the way you interact with AI.
Advantages of custom GPTs for SEOs
While users with a ChatGPT Plus or Enterprise account can already tweak ChatGPT’s responses using custom instructions, the GPT builder takes customization to a whole new level—especially handy for SEO professionals. Here’s why it’s a game-changer:
- Create Multiple GPTs: You can build as many custom GPTs as you need, allowing you to switch between different SEO-focused chatbots for various tasks. This offers far more flexibility than relying on a single set of custom instructions, which is limited to one set of rules. Whether you’re conducting keyword research, crafting meta descriptions, or analyzing site performance, having specialized GPTs means you get tailored assistance for each specific task, boosting your efficiency and effectiveness.
- Upload Knowledge Files: Instead of manually entering SEO guidelines, templates, or strategies each time, you can upload your own knowledge files directly into your custom GPT. Your SEO Bot will refer to these files when generating responses, streamlining your workflow and ensuring consistency across all your projects. This not only saves you time but also ensures that all outputs are aligned with your specific SEO strategies and best practices.
- Share Your GPT: After you’ve fine-tuned your GPT to your exact specifications, you can easily share it with colleagues or clients (as long as they have a ChatGPT Plus or Enterprise subscription). This makes collaboration a breeze, allowing everyone involved to benefit from the same tailored insights and tools—but we’ll delve more into this later.
By leveraging these features, custom GPTs provide a level of personalization and efficiency that’s tough to beat. They transform how you approach your SEO tasks, making your workflow smoother and more effective. In essence, custom GPTs empower you to optimize not just websites, but your entire SEO process.
How to create a custom SEO Bot GPT
Here’s the short version of how to build your own custom SEOBot GPT using OpenAI’s GPT builder.
1. Log in to your OpenAI account
Before you get started, you must have a ChatGPT Plus or Enterprise account. Already have the required account type? Click Log in to start chatting.

2. Create your custom GPT
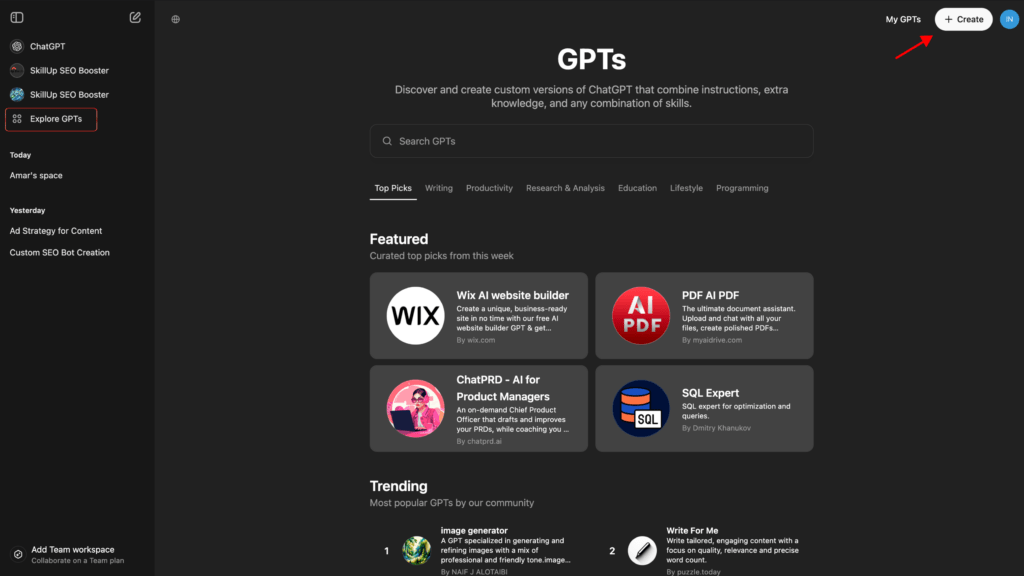
- In the side panel, click Explore GPTs.
- Click Create.

3.After clicking Create, you’ll be presented with a split-screen interface: the Create panel for inputting prompts, and the Preview panel for testing the bot in real-time.Enter specific instructions like “Help with SEO keyword research” or “Generate meta descriptions for web pages.”The GPT builder will suggest a name and a profile picture for your SEO Bot. You can accept these suggestions or modify them.

4. If the SEO Bot gives responses that are too lengthy, you can instruct it to be more concise.If it generates SEO advice without mentioning data sources, you can ask it to always cite relevant SEO tools like Ahrefs or SEMrush.

You can accept the initial suggestions or ask the GPT builder to modify them If you accept the initial suggestions, you can always modify them later on. The GPT builder will prompt you to enter more specific instructions to fine-tune your chatbot’s behavior.

5. If you’re not sure how you want to modify your chatbot’s behavior, that’s ok. My suggestion is to test your chatbot in the Preview panel—interact with it how you normally would—and use its responses to inform your modifications. For example, if your chatbot generates lengthy responses, you might tell the builder to keep the responses short. Or if the chatbot produces facts without citing its sources, you can tell it to always cite its sources. Continue to refine your prompts until your chatbot starts to return the kinds of responses you want your final chatbot to generate.
3. Configure your custom GPT
Now that you’ve set up the basics, you can further customize your GPT with advanced settings.

- Click Configure.
- If you want, you can change your chatbot’s name and description as you normally would. Here’s how to modify the other advanced settings:
- Instructions. Update the instructions generated by the GPT builder, or enter additional instructions or guidelines on how your chatbot should or shouldn’t behave.

- Conversation starters. Click X next to any prompt to remove it. Or enter a new prompt in an empty Conversation starters field.

- Knowledge. Want your chatbot to rely on your company’s style guide to draft its responses? Or maybe you want it to scan through PDFs of customer personas to give it additional context. Click Upload files, and add any relevant files for your chatbot to reference.

It’s worth mentioning that my chatbot didn’t consistently refer to the guide I uploaded. But this could be because I need to write clearer prompts in my GPT instructions. Tinker with it until it’s using your uploaded documents in the way you intended.
- Capabilities. By default, your chatbot can browse the web and create AI-generated images. If you also want it to run code or analyze data, click Code Interpreter & Data Analysis.
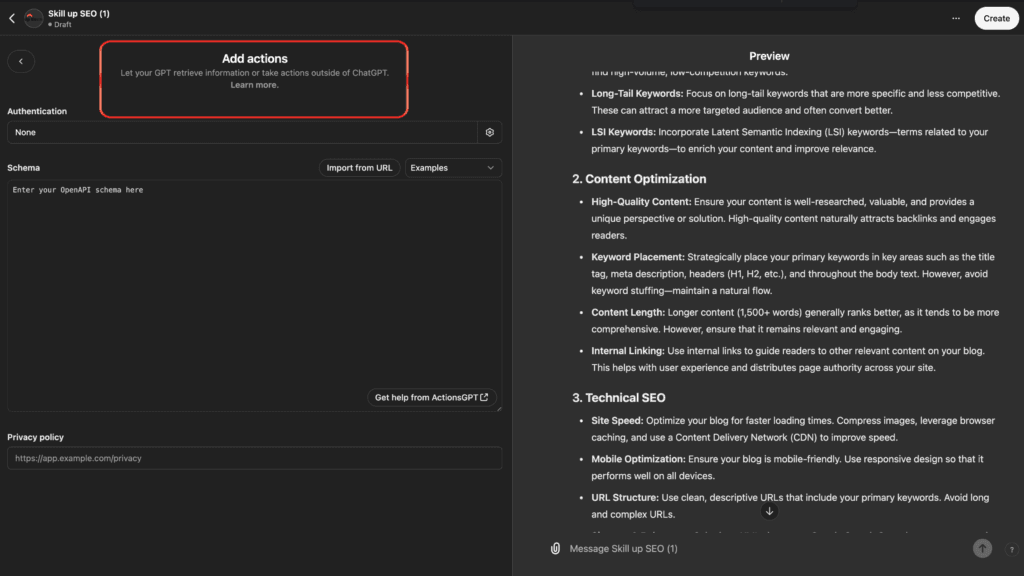
- Actions. If you want your chatbot to retrieve external information or take actions outside of the ChatGPT platform, click Create new action. Here you can specify how you want your chatbot to use any third-party APIs.

4. Save your custom GPT
- Once you’re happy with your chatbot, click Create. (If you already created your custom GPT and are publishing changes to it, click Update.)
- Select how you want to share your custom GPT: by invite only, anyone with the GPT link, or publicly in the GPT store. If you’re on an Enterprise plan, you can also make it available to anyone within your organization.

3. Click Update. If you’re updating the sharing permissions on an existing GPT, click Save.
ChatGPT, along with any custom GPTs you build, will appear in the side panel of the ChatGPT home page. Click the GPT you want to use and interact with it the way you normally would. Here’s the custom GPT I created to help me for ideal ad strategy for my content

Of course, since AI chatbots still have a tendency to hallucinate, it’s always a good idea to confirm the accuracy of your custom GPT’s responses.
5. How to edit your custom GPT
Despite how intuitive it feels to click the pencil icon next to your custom chatbot in the side panel of ChatGPT so that you can edit your chatbot, clicking that will only cause disappointment—I mean, let you start a new chat. Here’s how to edit your custom GPT.
- In the side panel, click the GPT you want to modify.
- Click the name of your custom GPT in the top-left of the main conversation area.
- Click Edit GPT.
- Update your GPT settings.
- Click Update.
And here’s how to delete a custom GPT.
- In the side panel, click the GPT you want to delete.
- Click the name of your custom GPT in the top-left of the main conversation area.
- Click Edit GPT.
- Next to Share, click the ellipsis (
...), and select Delete GPT. - In the confirmation window, click Delete GPT.
Conclusion
In conclusion, custom GPTs empower you to create specialized AI chatbots tailored to your specific SEO needs, enhancing efficiency and productivity. By following the steps outlined above, you can easily build, configure, and refine your own SEO Bot to assist with tasks like keyword research, meta description generation, and more. Remember to test your chatbot thoroughly and adjust its settings to ensure it provides accurate and valuable responses.
For those interested in building more advanced AI chatbots, consider exploring how to use LangChain with ChatGPT GPT-4. LangChain offers a comprehensive framework for developing sophisticated chatbots with enhanced capabilities. Check out the article “Using LangChain with ChatGPT GPT-4: A Comprehensive Guide” to learn how to build AI chatbots using LangChain.


